Preparations Before Mounting the Share
You'll need the hostname or IP address of the SMB server that you want to mount, the name of the share, and the credentials for the share. In this example, we'll use the IP address 192.168.1.100 and the share myshare.
Install cifs-utils. CIFS stands for Common Internet File System and is the basis for the SMB protocol. You can read more about it on Wikipedia.
sudo apt install cifs-utils
Create a directory for mounting SMB shares. This is typically /media or /mnt by convention.
sudo mkdir /media/myshare
Create a file to hold the credentials for mounting the SMB share. We'll put it in /root for simplicity. Using a configuration file is preferred over specifying the credentials on the command line.
sudo nano /root/.smb-creds-myshare.conf
Add the following lines to the file. Note: You can use username or user for the username, so don't be confused if you see user in examples elsewhere.
username=myusername
password=123456789
Press CTRL-X to save the changes when you're finished, Y to confirm and exit. Then update the permissions on the file so that only the root user can read it.
sudo chmod 400 /root/.smb-creds-myshare.conf
4 specifies that the file is read-only and executable for root (the owner). The remaining two 0 specify that no other users have access.
If You're Connecting to a macOS Computer
If you're connecting to a macOS computer and find that you're unable to mount the share, you'll need to make a configuration change on the Mac to support "Windows File Sharing". Otherwise, you can skip to Mounting the Share.
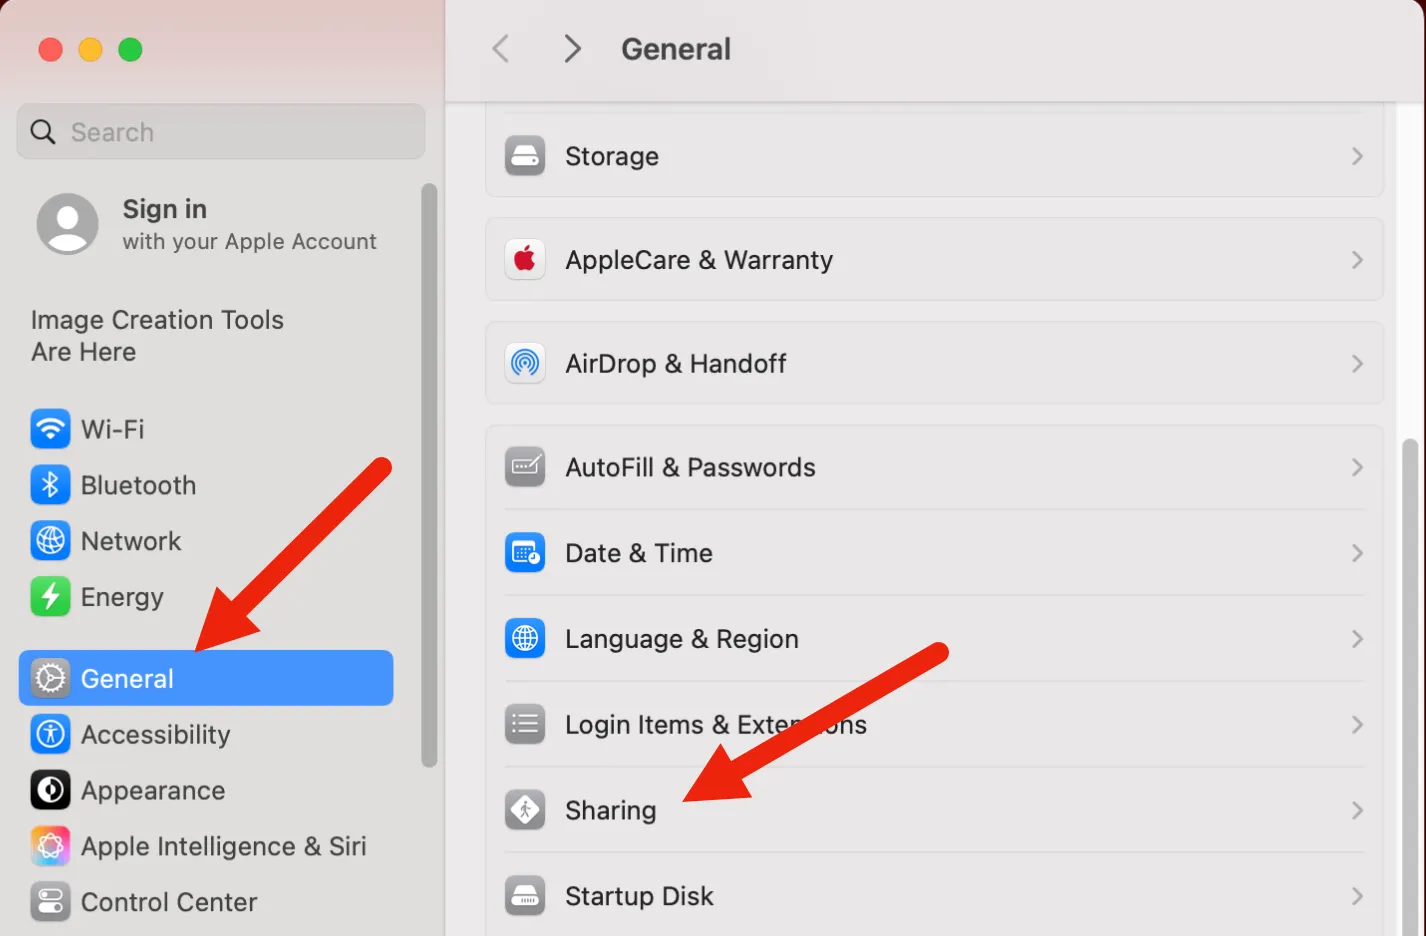
Open your Mac's System Preferences, navigate to General and then Sharing.

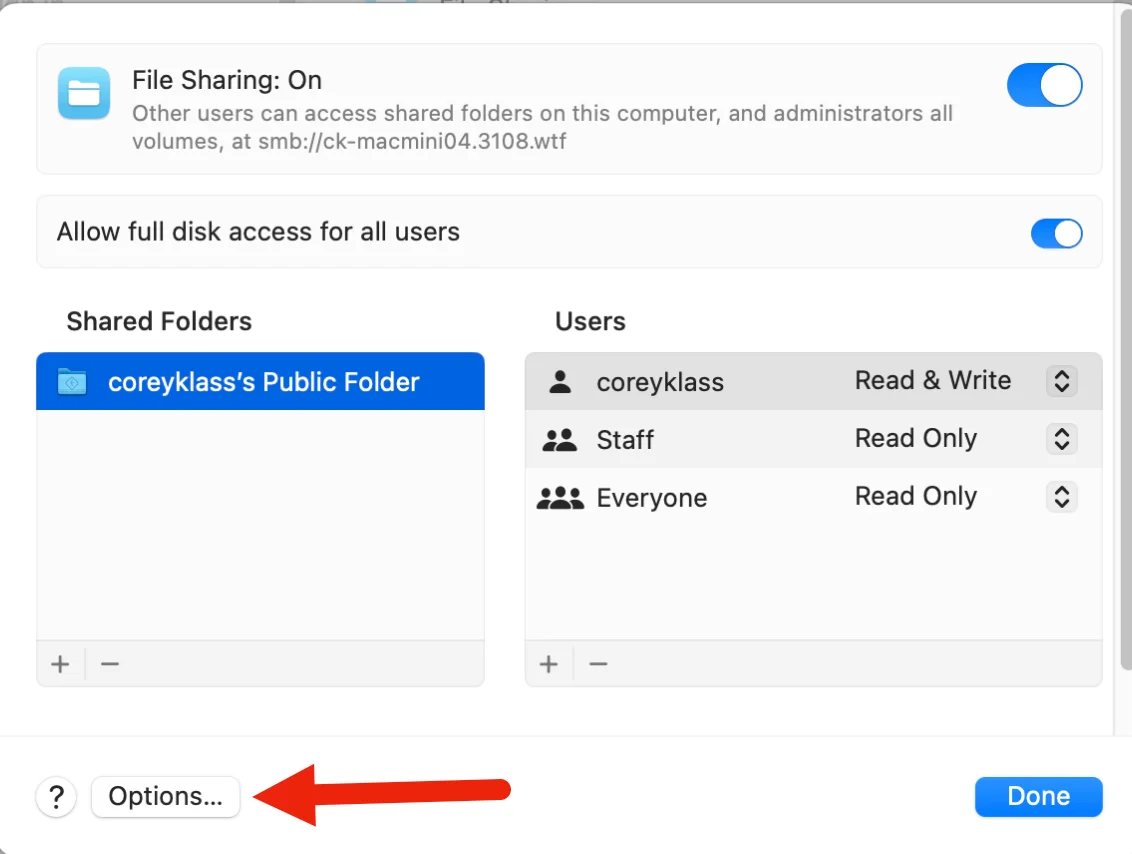
Click the i button next to File Sharing.

Click the Options button at the bottom of the window.

Under Windows File Sharing, check the box next to the username you want to use. Click Done and close the settings windows. This will allow you to mount the share.

Mounting the Share
You can now try mounting the share with this command.
sudo mount -t cifs -o rw,vers=3.0,dir_mode=0777,file_mode=0777,credentials=/root/.smb-creds-myshare.conf //192.168.1.100/myshare /media/myshare
If you were successful, you should see the share mounted in /media/myshare.
Breaking Down the Command
Lets break down the command in more detail.
mount -t cifs
The mount command is used to mount a file system, whether it's a local file system or a network file system. -t specifies the type of file system to mount.
-o rw,vers=3.0,dir_mode=0777,file_mode=0777,credentials=/root/.smb-creds-myshare.conf
The -o option is used to specify options for the mount command.
The rw option specifies that the share should be mounted read-write. If you wanted to mount the share as read-only, you would replace rw with ro.
The vers=3.0 option specifies that the SMB protocol version should be 3.0. Depending on the server, you may need to use a different version.
The dir_mode and file_mode options specify the permissions for the directories and files in the share. The value 0777 indicates that everyone has full access -- the owner, the group, and other users.
The credentials option specifies the location of the credentials file that we created earlier.
//192.168.1.100/myshare
The // prefix specifies that the share is on a remote server. The IP address or hostname of the server is followed by the name of the share. If this looks familiar, it's because it's similar to the syntax for Windows SMB shares, except that it uses forward slashes instead of backslashes.
/media/myshare
The final argument is the directory where the share should be mounted.
Auto-Mounting the Share on Boot
You can also add the share to the /etc/fstab file so that it mounts automatically when the system boots. You'll need all of the same information as for a manual mount, but ordered a little differently.
Open the auto-mount file with this command.
sudo nano /etc/fstab
Scroll to the bottom of the file and add the following lines.
//192.168.1.100/myshare /media/myshare cifs rw,vers=3.0,dir_mode=0777,file_mode=0777,credentials=/root/.smb-creds-myshare.conf
Press CTRL-X to save the changes when you're finished, Y to confirm and exit. Reboot your server and the share should be mounted automatically.
NOTE: By default, boot process will stop if there is an error mounting a share. You can change this behavior by adding nofail to the mount line in /etc/fstab, as such:
//192.168.1.100/myshare /media/myshare cifs rw,vers=3.0,dir_mode=0777,file_mode=0777,credentials=/root/.smb-creds-myshare.conf,nofail
Adding the Share as a Dependency to a Service
If you want a service to only start after the share is mounted, you can add the share as a dependency to the service by editing the service configuration file.
Lets say we want to make the my-service service depend on the myshare share. We'll edit the /etc/systemd/system/my-service.service file.
sudo nano /etc/systemd/system/my-service.service
Add the following lines to the [Unit] section. If the After line is already present, add a space and then the media-myshare.mount text to the end of the line.
After=network.target media-myshare.mount
BindsTo=media-myshare.mount
systemd uses the .mount suffix to indicate that the file is a mount unit. The naming convention is to use the path to the share, replacing all slashes with dashes, and then adding .mount to the end. For example, if the mount point is /mnt/business-files, the mount unit would be named mnt-business-files.mount.
After tells systemd that the service should only start after the media-myshare.mount mount unit has been started. BindsTo tells systemd that the service can only run if the media-myshare.mount mount unit is running. You can refer to the systemd documentation for more information.
Note: Systemd has problems with the .mount suffix if any of the folder names in the path contain a dash. It will throw an error that the mount unit cannot be found. Unfortunately, the only workaround is to rename the offending folder to remove the dash.

